
This article presents how to install Oracle 12C(12.1.0.1) Release 1 on Fedora 19.
Read following article how-to install Fedora 19 Linux:Install Fedora 19 (for comfort set 2G memory for your virtual machine before proceeding with Oracle software installation).
Check latest articles:
Software
Software for 12CR1 is available on OTN or edelivery
- OTN: Oracle Database 12c Release 1 (12.1.0.1) Software (64-bit).
- edelivery: Oracle Database 12c Release 1 (12.1.0.1) Software (64-bit)
Database software
linuxamd64_12c_database_1of2.zip
linuxamd64_12c_database_2of2.zip
OS configuration and preparation
OS configuration is executed as root. To login as root just execute following command in terminal.
su - root
The “/etc/hosts” file must contain a fully qualified name for the server.
<IP-address> <fully-qualified-machine-name> <machine-name>
For example.
127.0.0.1 fedora.dbaora.com fedora localhost.localdomain localhost
Set hostname
hostnamectl set-hostname fedora.dbaora.com --static
Add groups
#groups for database management
/usr/sbin/groupadd -g 501 oinstall
/usr/sbin/groupadd -g 502 dba
/usr/sbin/groupadd -g 503 oper
Add user Oracle for database software
/usr/sbin/useradd -u 501 -g oinstall -G dba,oper oracle
Change password for user Oracle
passwd oracle
Disable secure linux by editing the “/etc/selinux/config” file, making sure the SELINUX flag is set as follows. It requires REBOOT to be effective !!!
SELINUX=disabled
Edit the “/etc/redhat-release” file replacing the current release information “Fedora release 19 (Schrödinger’s Cat)” with the following.
redhat release 6
Packages
Check which packages are installed and which are missing
rpm -q --qf '%{NAME}-%{VERSION}-%{RELEASE}(%{ARCH})\n' binutils \
compat-libstdc++-33 \
gcc \
gcc-c++ \
glibc \
glibc-common \
glibc-devel \
glibc-headers \
ksh \
libaio \
libaio-devel \
libgcc \
libstdc++ \
libstdc++-devel \
libXext \
libXtst \
libX11 \
libXau \
libXi \
make \
sysstat \
unixODBC \
unixODBC-devel \
zlib-devel
Install missing packages. It’s just example:
yum install compat-libstdc++-33 unixODBC unixODBC-devel sysstat
Add kernel parameters to /etc/sysctl.conf
# kernel parameters for 12gR1 installation

fs.file-max = 6815744
kernel.sem = 250 32000 100 128
kernel.shmmni = 4096
kernel.shmall = 1073741824
kernel.shmmax = 4398046511104
net.core.rmem_default = 262144
net.core.rmem_max = 4194304
net.core.wmem_default = 262144
net.core.wmem_max = 1048576
fs.aio-max-nr = 1048576
net.ipv4.ip_local_port_range = 9000 65500
Apply kernel parameters
/sbin/sysctl -p
Add following lines to set shell limits for user oracle in file /etc/security/limits.conf
# shell limits for users oracle 12gR1

oracle   soft   nofile   1024
oracle   hard   nofile   65536
oracle   soft   nproc    2047
oracle   hard   nproc    16384
oracle   soft   stack    10240
oracle   hard   stack    32768
Additional steps
Create .bash_profile for user oracle
# Oracle Settings
export TMP=/tmp

export ORACLE_HOSTNAME=fedora.dbaora.com
export ORACLE_UNQNAME=ORA12C
export ORACLE_BASE=/ora01/app/oracle
export ORACLE_HOME=$ORACLE_BASE/product/12.1.0/db_1
export ORACLE_SID=ORA12C

PATH=/usr/sbin:$PATH:$ORACLE_HOME/bin

export LD_LIBRARY_PATH=$ORACLE_HOME/lib:/lib:/usr/lib;
export CLASSPATH=$ORACLE_HOME/jlib:$ORACLE_HOME/rdbms/jlib;

alias cdob='cd $ORACLE_BASE'
alias cdoh='cd $ORACLE_HOME'
alias tns='cd $ORACLE_HOME/network/admin'
alias envo='env | grep ORACLE'

umask 022

envo
Directory structure
Create directory structure as user root
ORACLE_BASE – /ora01/app/oracle
ORACLE_HOME – /ora01/app/oracle/product/12.1.0/db_1
mkdir -p /ora01/app/oracle/product/12.1.0/db_1
chown oracle:oinstall -R /ora01
In Fedora 19 /tmp data is stored on tmpfs which consumes memory and is too small. To revert it back to storage just run following command and REBOOT machine to be effective.
systemctl mask tmp.mount
Install database software
Let’s start with database software installation as oracle user.
su - oracle

--unizp software it will create directory "database"
--where you can find installation software
unzip linuxamd64_12c_database_1of2.zip
unzip linuxamd64_12c_database_2of2.zip

--I defined 4 aliases in .bash_profile of user oracle to make
--administration heaven :)

[oracle@fedora ~]$ alias envo cdob cdoh tns
alias envo='env | grep ORACLE'
alias cdob='cd $ORACLE_BASE'
alias cdoh='cd $ORACLE_HOME'
alias tns='cd $ORACLE_HOME/network/admin'

--run alias command envo to display environment settings
envo
ORACLE_UNQNAME=ORA12C
ORACLE_SID=ORA12C
ORACLE_BASE=/ora01/app/oracle
ORACLE_HOSTNAME=fedora.dbaora.com
ORACLE_HOME=/ora01/app/oracle/product/12.1.0/db_1

--run alias command cdob and cdoh
--to check ORACLE_BASE, ORACLE_HOME
[oracle@fedora ~]$ cdob
[oracle@fedora oracle]$ pwd
/ora01/app/oracle

[oracle@fedora db_1]$ cdoh
[oracle@fedora db_1]$ pwd
/ora01/app/oracle/product/12.1.0/db_1

--run installation from "database" directory
./runInstall
1. Uncheck checkbox “I wish to receive security updates via My Oracle Support” and then click “Next” button.

2. Ignore following message and click “Yes” button.

3. Select “Skip software updates” and click “Next” button.

4. Ignore following message. Just click “Yes” button.

5. Select “Create and configure a database” then click “Next” button.

6. Select “Desktop Class” and click “Next” button.

7. On the screen you need to define global database name and pluggable database name. Rest of options you can keep default. Then click “Next” button.
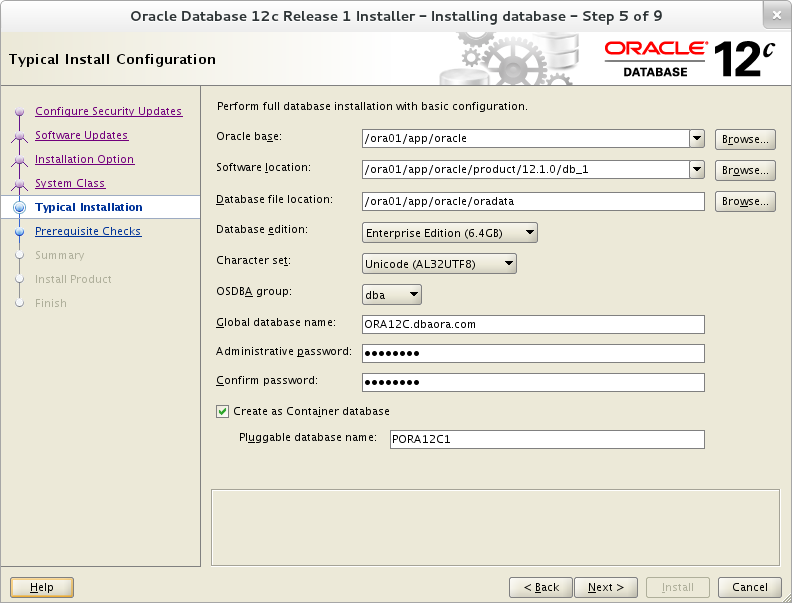
8. Accept default settings then click “Next” button.

9. Summary screen just before installation. It’s the last moment to make changes in previous steps. If you are ready click “Install” button.

10. Installation begins …

11. Unfortunately I received error during binaries linking
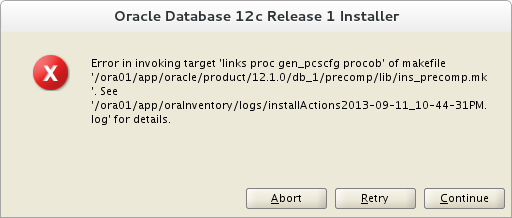
in log you should see
/usr/bin/ld: note: '__tls_get_addr@@GLIBC_2.3' is defined in
DSO /lib64/ld-linux-x86-64.so.2 so try adding it to the linker
command line /lib64/ld-linux-x86-64.so.2: could not read symbols:
Invalid operation

INFO: collect2: error: ld returned 1 exit status
12. To solve this problem do following as user Oracle
- remove directory /ora01/app/oracle/product/12.1.0/db_1/lib/stubs
rm -rf /ora01/app/oracle/product/12.1.0/db_1/lib/stubs
- backup file $ORACLE_HOME/rdbms/lib/env_rdbms.mk
cd $ORACLE_HOME/rdbms/lib/
cp env_rdbms.mk env_rdbms.mk.bck
- make changes in $ORACLE_HOME/rdbms/lib/env_rdbms.mk
modify line 176
LINKTTLIBS=$(LLIBCLNTSH) $(ORACLETTLIBS) $(LINKLDLIBS)
to
LINKTTLIBS=$(LLIBCLNTSH) $(ORACLETTLIBS) $(LINKLDLIBS) -lons
modify line 279 and 280
LINK=$(FORT_CMD) $(PURECMDS) $(ORALD) $(LDFLAGS) $(COMPSOBJS)
LINK32=$(FORT_CMD) $(PURECMDS) $(ORALD) $(LDFLAGS32) $(COMPSOBJS)
to
LINK=$(FORT_CMD) $(PURECMDS) $(ORALD) $(LDFLAGS) $(COMPSOBJS) -Wl,--no-as-needed
LINK32=$(FORT_CMD) $(PURECMDS) $(ORALD) $(LDFLAGS32) $(COMPSOBJS) -Wl,--no-as-needed
modify line 3041 and 3042
TG4PWD_LINKLINE= $(LINK) $(OPT) $(TG4PWDMAI) \
        $(LLIBTHREAD) $(LLIBCLNTSH) $(LINKLDLIBS)
to
TG4PWD_LINKLINE= $(LINK) $(OPT) $(TG4PWDMAI) \
        $(LLIBTHREAD) $(LLIBCLNTSH) $(LINKLDLIBS) -lnnz12
Once it’s done click “Retry” button on screen from point 11 to continue with installation. Linking should finish properly and binaries installation should continue.
13. In the end you will be asked to run as root two scripts. Once they are completed click “OK” button – installation will proceed.
/ora01/app/oraInventory/orainstRoot.sh
/ora01/app/oracle/product/11.2.0/db_1/root.sh


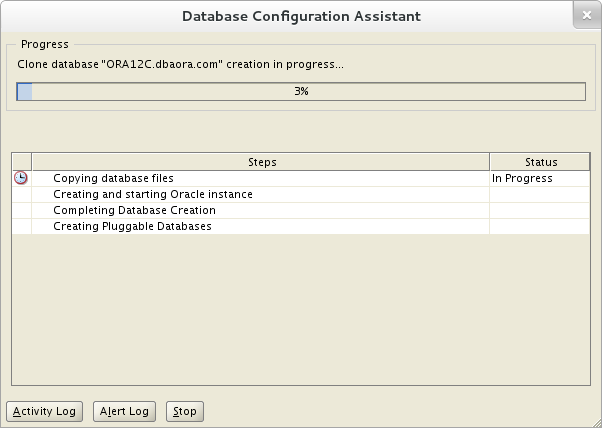
18. Once binaries are installed automatically DBCA (database configuration assistant) will start to create new database.
19. You should see summary screen for your database. You can click “Password Management” to unlock and change passwords for default account. Click “OK” button.

20. Installation is finished. Click “Close” button.

21. Post installation steps
Edit the “/etc/redhat-release” file to restore original release information.
Fedora release 19 (Schrödinger’s Cat)
Edit the “/etc/oratab” file to set restart flag for ORA12C to ‘Y’.
ORA12C:/u01/app/oracle/product/12.1.0/db_1:Y
Have a fun 🙂
Tomasz
Why are you adjusting /etc/redhat-release … it does not make sense on Fedora?!, /etc/redhat-release will be checked and the installer will get an error because of the missing redhat-release package …
Thanks for this page! – It just saved me a lot of time.
Tank you very much !!!!!!!!!!!!!!!!!!!!!!!!!!!!!!
thank you very much, i have been stuck in the linking problem.
Hi Tomasz,
Your workaround went like a charm on Fedora20.
Thanks!
Great 🙂
Great job. Thanks for sharing.
Thank you for publishing this useful document. It worked perfectly for Oracle 12 and CentOS 7.
So it’s time for me to write some articles about Centos 7 🙂
Every thing is very clear except when I want to set the “fully qualified name for the server” and I go to /etc/hosts file this is what I get:
[oracle@localhost ~]$ cat /etc/hosts
127.0.0.1 localhost.localdomain localhost
::1 localhost6.localdomain6 localhost6
I am not sure what should I put in “hostnamectl set-hostname fedora.dbaora.com –static” command instead of fedora.dbora.com??
Any suggestion?
Thank you 🙂
[oracle@localhost ~]$ <- your prompt shows your hostname is "localhost" so you don't have to do anything. Keep original /etc/hosts you can change your hostname using "hostnamectl set-hostname" but it requires changes in /etc/hosts as well. I used fedora.dbaora.com. Regards Tomasz
Thank you for your fast reply.
I got it so I won’t touch it.
Then should I omit these 2 lines:
export ORACLE_HOSTNAME=fedora.dbaora.com
ORACLE_HOSTNAME=fedora.dbaora.com
OR
modify them to these:
export ORACLE_HOSTNAME=localhost.localdomain
ORACLE_HOSTNAME=localhost.localdomain
Best regards
Bobby
Yes