
This article presents how to quickly install Oracle Database 11G Release 2 (11.2.0.3) and as Oracle Grid 11G Release 2(11.2.0.3) on Windows.
Check article for new release Install Oracle 12C Release 1 (12.1) on Windows 7, 8
Software used:
- Oracle Database 11G Release 2(11.2.0.3) – 64 bit for Windows
- Oracle Grid 11G Release 2(11.2.0.3) – 64 bit for Windows
- Windows 8 Pro 64 bit
You can download Oracle Database 11G Release 2(11.2.0.3) and Oracle Grid 11G Release 2(11.2.0.3). You can download them on Oracle support formerly MetaLink.
p10404530_112030_MSWIN-x86-64_1of7.zip - database software
p10404530_112030_MSWIN-x86-64_2of7.zip - database software
p10404530_112030_MSWIN-x86-64_1of7.zip - grid software
Hardware and software requirements for database and grid software:
- at least 4GB ram as minimum, 20G space for binaries and 40G for ASM devices
- Windows Server 2003 – all x64 editions
- Windows Server 2003 R2 – all x64 editions
- Windows XP Professional x64 Edition
- Windows Vista x64 – Business, Enterprise, and Ultimate editions
- Windows Server 2008 x64 and Windows Server 2008 R2 x64 – Standard, Enterprise, Datacenter, Web, and Foundation editions
- Windows 7 x64 – Professional, Enterprise, and Ultimate editions
Windows 8 Support
Starting with Oracle Database 11g Release 2 (11.2.0.4), Oracle Database server and client are supported on Windows 8. Oracle RAC is not supported on Windows 8.
In case you are not planning to install grid 2GB ram is enough.
This installation was done for 11.2.0.3 on Windows 7 but with release 11.2.0.4 it’s possible on Windows 8.
ASM devices
To run ASM on Windows you need to create at least one RAW logical partition. For this presentation I have created 2 logical partitions each 20GB using diskpart.exe program.
RAW means not formated partition and without assigned letter.
Another option is to use “Computer management” interface which is user graphical interface. It includes “Disk management” tool to manage partitions.
It’s just example for diskpart.exe
1. List available disks on computer. There is only one disk with 40GB free space.
DISKPART> list disk

Disk ###   Status      Size     Free     Dyn  Gpt
 --------  ----------  -------  -------  ---  ---
 * Disk 0  Online      80 GB    40 GB
2. As first step you need to select disk before making any changes on it. In my case there is only one disk so it’s not necessary step but I wanted to show how to do it.
DISKPART> select disk 0

Disk 0 is now the selected disk.
3. List partitions. There is only one primary partition on disk.
DISKPART> list partition

Partition ###   Type              Size     Offset
 -------------  ----------------  -------  -------
 Partition 1    Primary           40 GB    1024 KB
4. Add new extended partition and 2 logical partitions.
DISKPART> create partition extended

DiskPart succeeded in creating the specified partition.

DISKPART> list partition

Partition ###   Type              Size     Offset
 -------------  ----------------  -------  -------
 Partition 1    Primary           40 GB    1024 KB
 * Partition 0  Extended          40 GB    40 GB

DISKPART> create partition logical size=20480

DiskPart succeeded in creating the specified partition.

DISKPART> create partition logical size=20480

DiskPart succeeded in creating the specified partition.
5. Verify new partitions.
DISKPART> list partition

Partition ###  Type              Size     Offset
-------------  ----------------  -------  -------
Partition 1    Primary             40 GB  1024 KB
Partition 0    Extended            40 GB    40 GB
Partition 2    Logical             20 GB    40 GB
* Partition 3  Logical             20 GB    60 GB
Install grid software
This presentation shows how to install grid software as standalone version which is nice to have to find out how ASM works. Unzip grid binaries to a directory and run setup.exe.
unzip p10404530_112030_MSWIN-x86-64_1of7.zip
cd grid
setup.exe
1. You should see following screen. Select “Skip software updates” and click “Next” button.

2. Select “Configure Oracle Grid Infrastructure for Standalone Server” and click “Next” button.

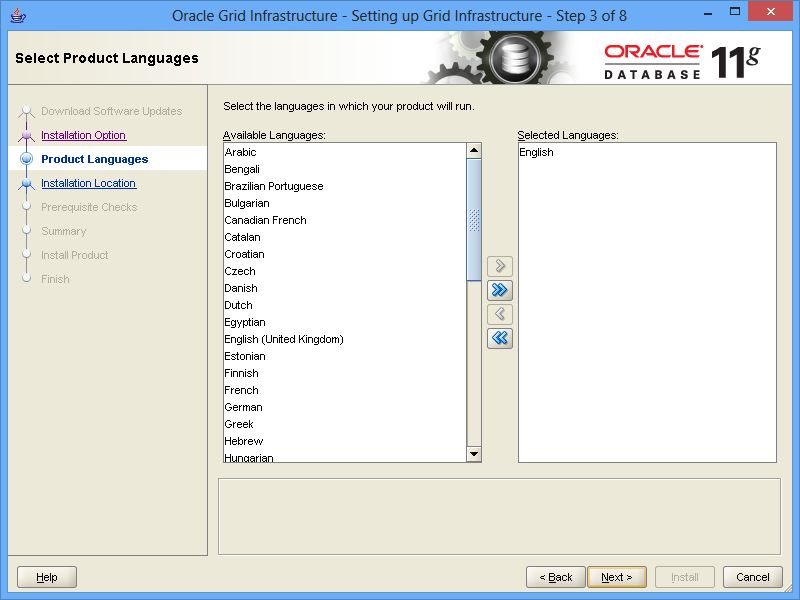
3. Select language and click “Next” button.
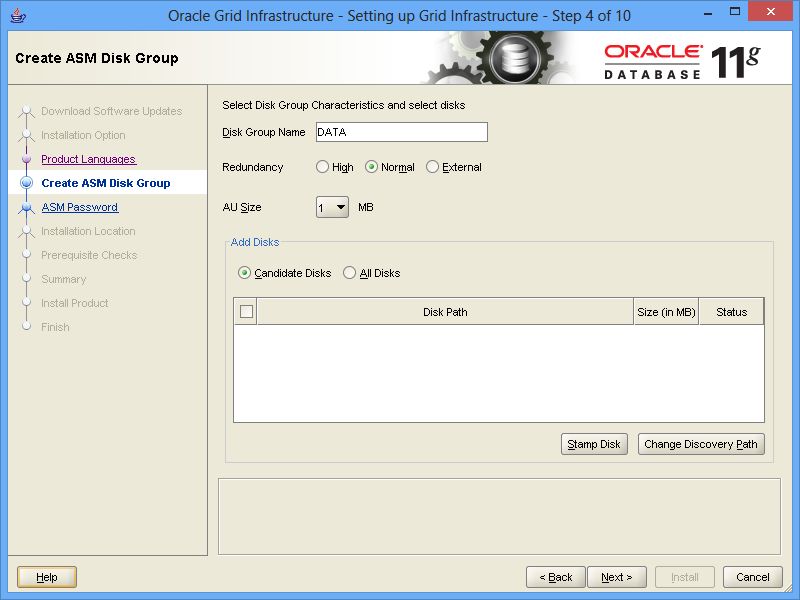
4. It’s time to create ASM diskgroup DATA. First you need to make created earlier partitions with diskpart.exe visible by ASM binaries. Click “Stamp Disk” button.
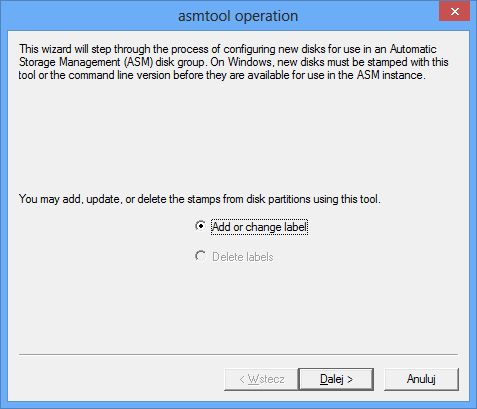
5. It will start asmtool. The tool is used to stamp devices(partitions) to be visible by Oracle binaries. Stamp means write some raw informations on the beginning of selected partition. Click “Next” button. Ye ye ye my bad “Dalej” ;). I use Polish windows :).
6. Select device which you want to stamp and enter label “DATA” for it. Then click “Next” button.

7. ASM will see this partition as “ORCLDISKDATA0”. Just click “Next” button.

8. Just click “OK”(Polish “Zakoncz”) button.

9. Repeat step 5,6,7,8 for another device and stamp it with label “BACKUP”. Once it’s done you should see 2 devices. Select redundancy to “External” and select device “ORCLDISKDATA0” and click “Next” button.

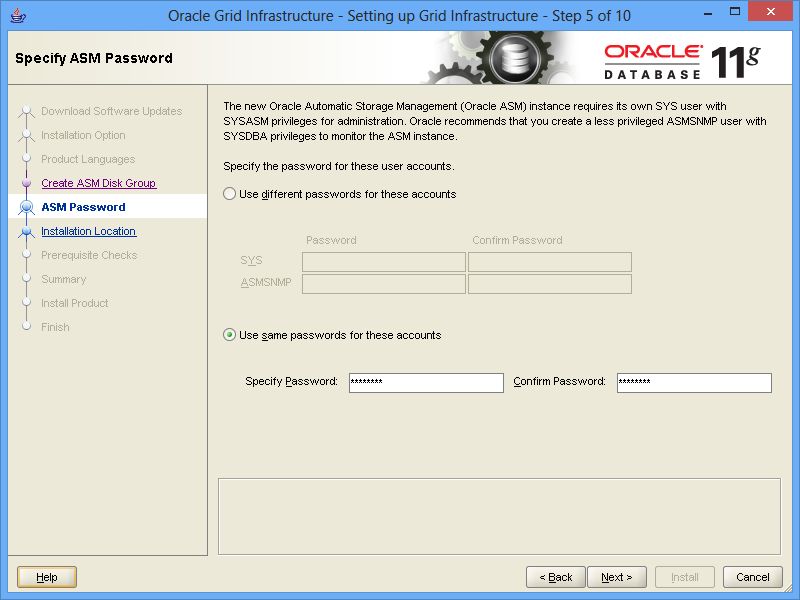
10. From security point of view you should specify separate password for user SYS and ASMSNMP. I set for both user the same password. Click “Next” button.
11. On this screen you can specify directory for grid binaries. If you have already some Oracle binaries it makes sense to select already defined Oracle Base.

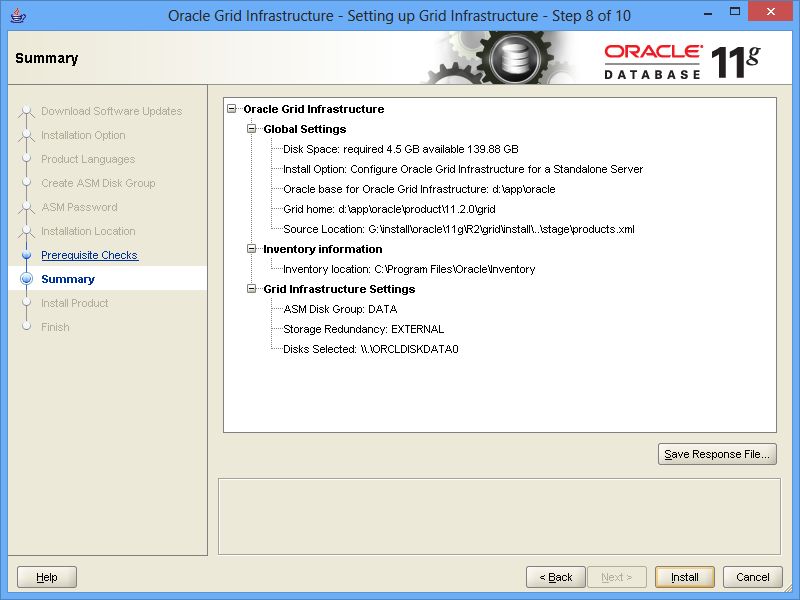
12. Summary screen just before installation begin. Click “Install” button.
13. Boring installation …


15. Installation completed. Just click “Close” button.

ASM configuration assistant ASMCA
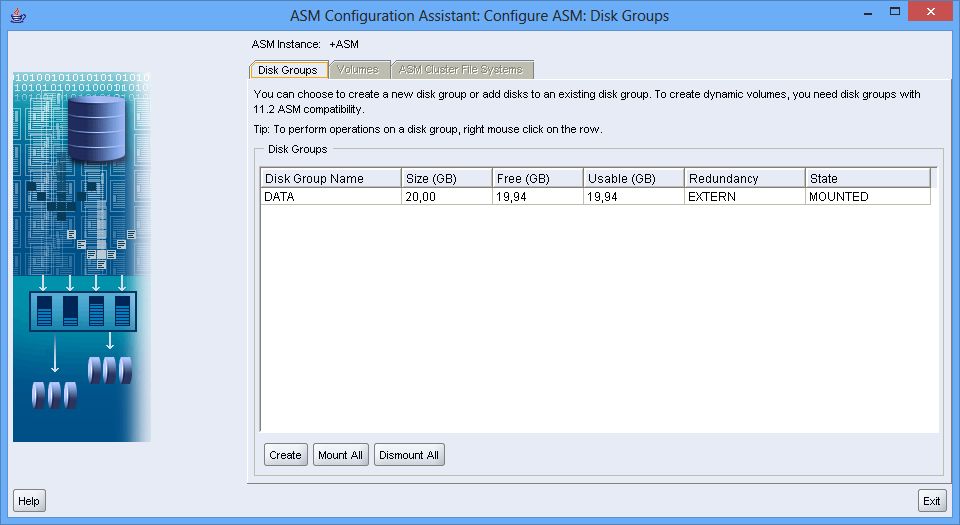
So far we have created only one ASM group DATA. I want to show how-to quickly add extra group to ASM instance.
1. Run “Automatic Storage Management Configuration Assistant” from Windows menu. Once it’s started click “Create” button.
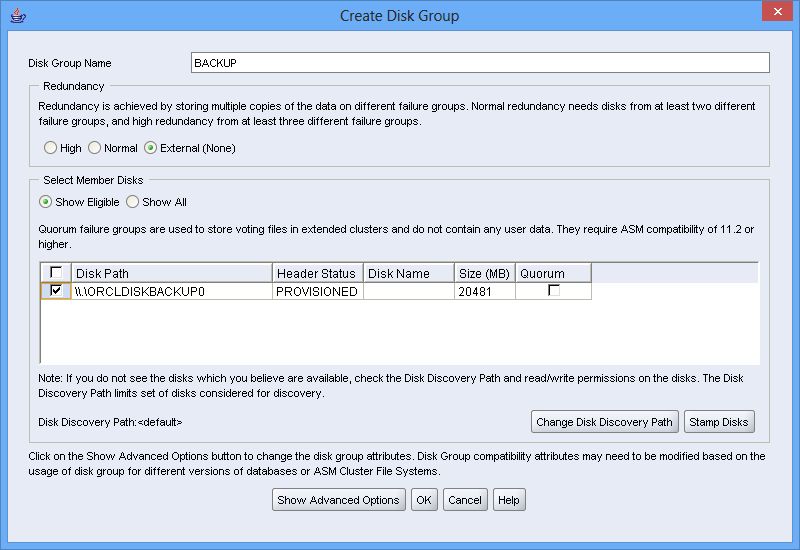
2. Enter disk group name BACKUP, select redundancy to “External”, check checkbox for “\\.\ORCLDISKBACKUP0″ device and click “OK” button.
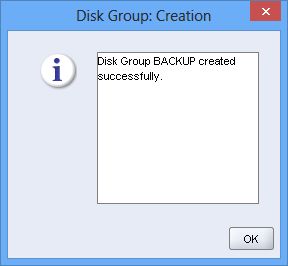
3. Soon new disk group should be created.

4. Two ASM disk groups “BACKUP” and “DATA” should be visible. Click “Exit” button.

Verify in sqlplus that two ASM diskgroups exist.
d:\app\oracle\product\11.2.0\grid\BIN>set ORACLE_SID=+ASM

d:\app\oracle\product\11.2.0\grid\BIN>sqlplus

SQL*Plus: Release 11.2.0.3.0 Production on Wed Jul 17 20:41:40 2013
Copyright (c) 1982, 2011, Oracle.  All rights reserved.

Enter user-name: / as sysasm

Connected to:
Oracle Database 11g Enterprise Edition Release 11.2.0.3.0
- 64bit Production With the Automatic Storage Management option

SQL> select name from v$asm_diskgroup;

NAME
------------------------------
BACKUP
DATA
Install database software
Unzip database software to a directory and run setup.exe
unzip p10404530_112030_MSWIN-x86-64_1of7.zip
unzip p10404530_112030_MSWIN-x86-64_2of7.zip
cd database
setup.exe
1. Uncheck checkbox “I wish to recive security updates via My Oracle Support” and click “Next” button.

2. Ignore this message and click “Yes”

3. Select “Skip software updates” and click “Next” button.

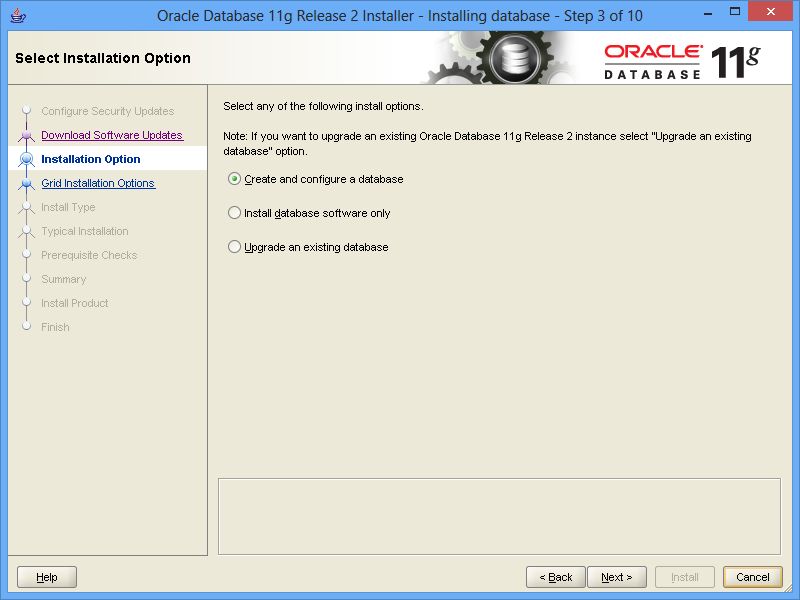
4. Select “Create and configure a database” and click “Next” button.
5. Select “Server Class” and click “Next” button.

6. Select “Single instance database installation” and click “Next” button.

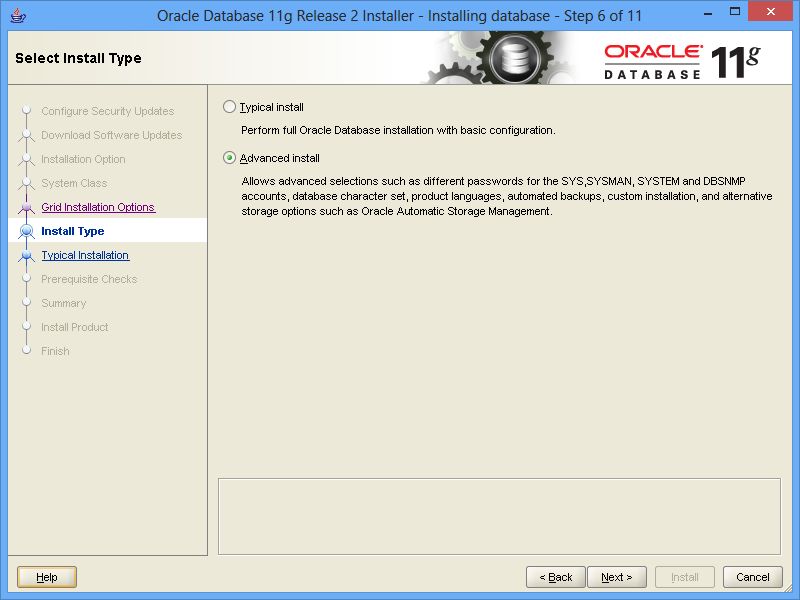
7. Select “Advanced install” and click “Next” button.
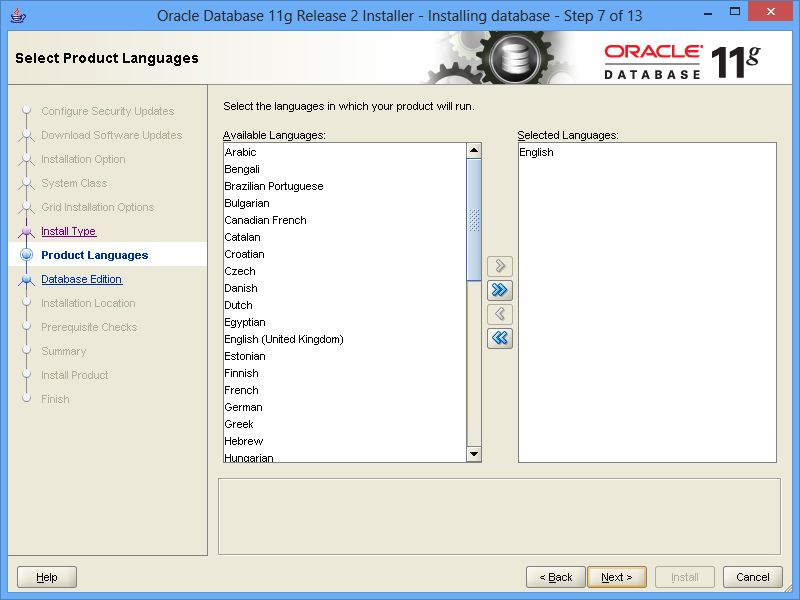
8. Select language and click “Next” button.
9. You can select here type of binaries to install. Once it’s done click “Next” button.

10. Define directories for database binaries and click “Next” button. The best is to select the same ORACLE_BASE as for grid software.

11. Accept default settings “General Purpose/Transaction Processing” and click “Next” button.

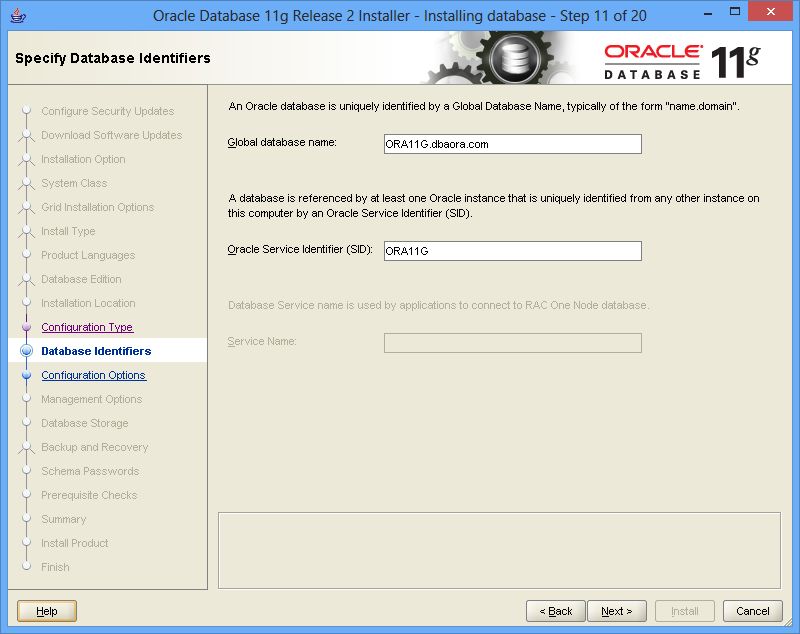
12. Enter global database name and SID for your database. Once it’s done click “Next” button.
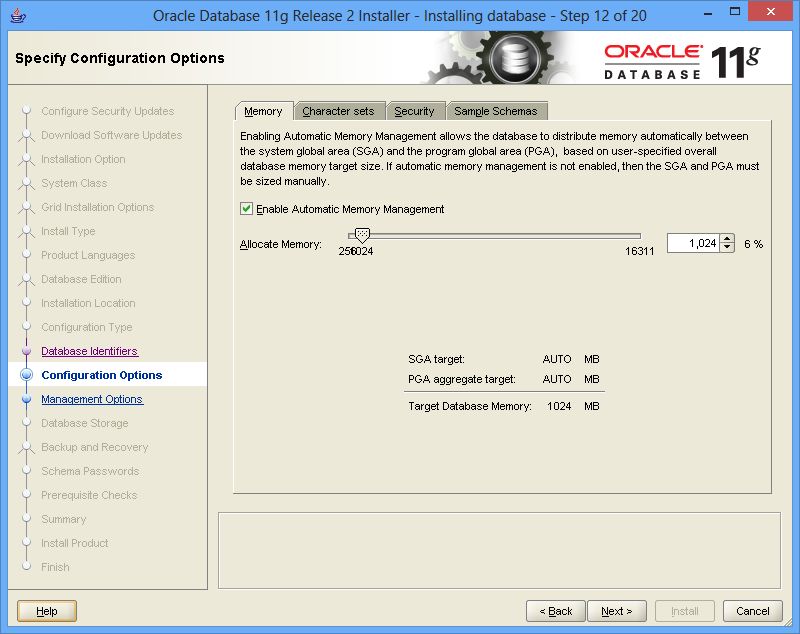
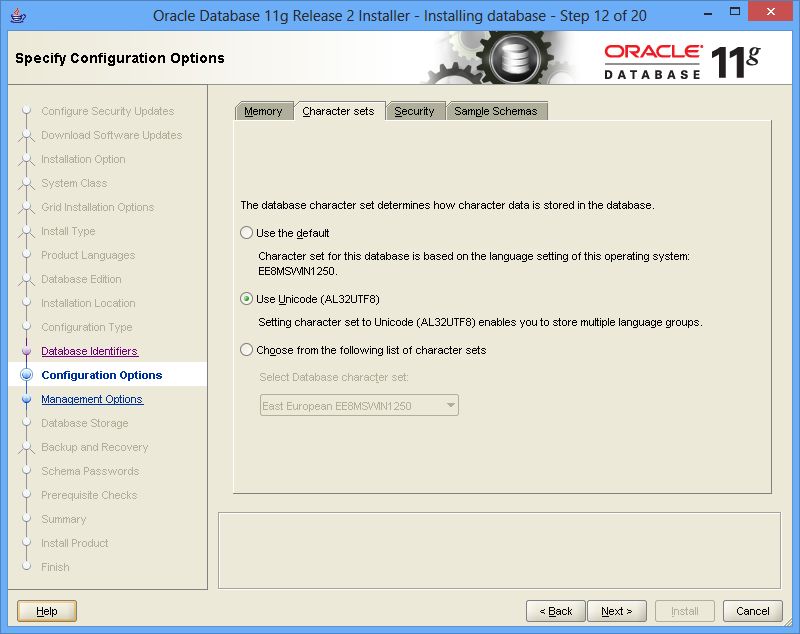
13. Specify more details about your database on 4 tabs where you can define memory settings, character set, security settings and if to install sample schema on your database. Once you are happy with your settings click “Next” button.


17. On this page you can register your database in Oracle Enterprise Manager or create local EM version like in the example below. Click “Next” button.

18. Select “Oracle Automatic Storage Management” to install database on ASM devices and enter password for user ASMSNMP(the password was defined during grid binaries installation). If you have skipped ASM grid installation select first option “File System” and specify directory where database files should be installed.

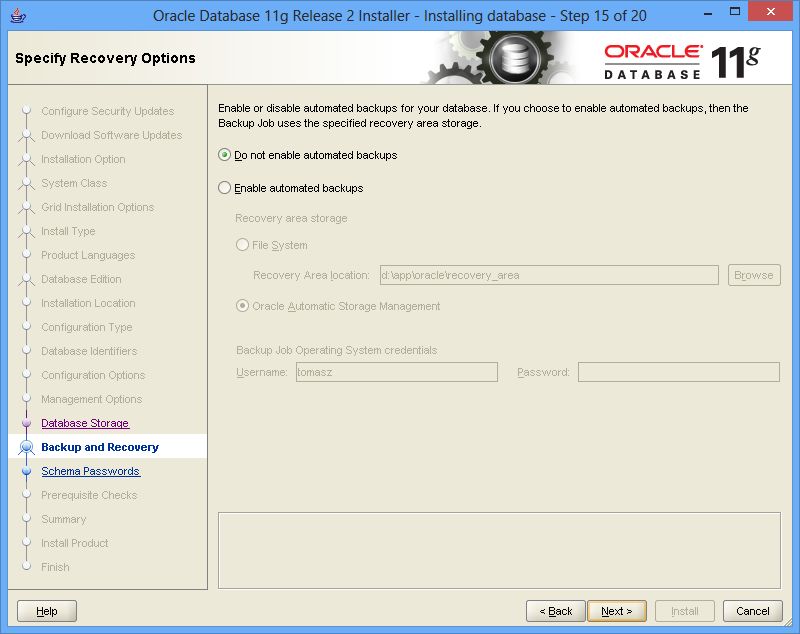
19. Here you can define automatic backups and directory or ASM where backups should be stored. Once you are happy with your selection click “Next” button.
20. Select diskgroup “DATA” for database datafiles. click “Next” button.

21. Specify password for each user or enter the same for all. Once it’s done click “Next” button.

22. If everything is right click “Install” button. It’s the last moment to come back to each of previous point and make changes.

23. Installation in progress … it will take some time so talk to your girlfriend or pet 🙂

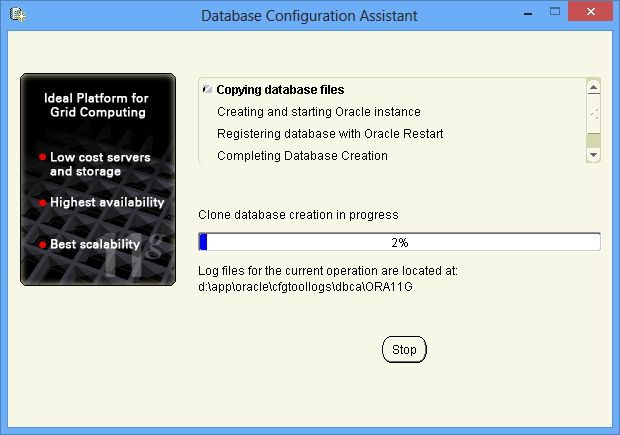
24. Database Configuration Assistant will start automatically and create database for you.
25. When database is ready you should see summary window. You can click “Password Management” to change passwords for many accounts in database. Once it’s done click “OK” button to continue.

26. You are lucky 11G installation is completed. Click “Close” button.

Have a fun 🙂
Tomasz
Thank you . Good Document. Help me a lot
Hi Good day,
Your site is very neat and impressive!
I’m a student working on developing an Oracle database and a web interface.
I was successfully able to install Oracle 11g on my Windows 8 pro surface. Unfortunately, my surface crashed (not due to Oracle though) I got it replaced since it was on warranty and when the OS upgraded to 8.1, I seem to not be able to install the 11.2.0.1.0 11g version on my 8.1 surface.
I saw your post about the 11.2.0.3 version but when I click on the link to download this version, I’m seeing that I need to ‘Enter a Support Identifier above to add to this list.’
I am not sure what this means. Is it that in order to download this version, I need some sort of special access?
Please advise me. I’ll appreciate any help.
Thank you.
Regards,
Sarah
Version Oracle 11.2.0.3 requires paid support to get it from metalink. On the other hand you can try to run installer 11.2.0.1 with ignore option -ignoreSysPrereqs. So just run cmd.exe as Administrator and start install.exe -ignoreSysPrereqs. Should work :).
Regards
Tomasz
Hi, thanks for your article. I’m new to Oracle and they used a lot of terms and it is hard to know what is what because the terms are not very descriptive. You said: “ASM devices — To run ASM on Windows you need to create at least one RAW logical partition. For this presentation I have created 2 logical partitions each 20GB using diskpart.exe program. RAW means not formated partition and without assigned letter.”
I have no idea what ASM is, if it applies to me, or what. All I want is to get Oracle DBMS running on my machine. Instead I’m getting an error. I’ve not seen a post on Oracle.com that solves it. I’m quite amazed.
I have Windows 7 64bit Enterprise Edition. I’m trying to install Oracle Standard or Enterprise DBMS. I figured this was better than installing Express which I assumed would be very limited and I wouldn’t be able to follow the tutorials at my job.
Thanks! Is ASM need and what is it for?
ASM is just option to manage disk devices. You don’t need to configure it nor install grid software. Just install database software with all defaults. It will create database for you as well.
Regards
Tomasz
I have a problem… i do not install Grid, just only Oracle Database…
The problem is that i follow same Steps with same source install files that i had done previosuly on Windows 7, but on Windows 8.1 it resuses to do the same.
When i did the install on Windows 7, i took snapshots of all Windows… now on Windows 8.1 i am following the same steps but it fails!
Worst… on Windows 7 it create some links to some Tools… on Windows 8.1 it does not create any one.
For example the one to run Oracle Net Manager, Oracle Net Configuration Assistant, etc… when installing on Windows 8.1 are missing.
Also i had noticed that after installer ends, on Windows 7 it was created some services… when on Windows 8.1 it has not!!!
How can i investigate what cause can be?
Please note: I am following on Windows 8.1 same steps i had done on Windows 7, and i am using same source folders/files, etc on a ReadOnly media as i had done on Windows 7.
I can think maybe of a pre-requisite? but which one? and how can i know /check for it?
Thanks!
I don’t think it’s certified on Windows 8.1. I have installed 11G 11.2.0.4 on 8 then upgraded to 8.1 and then I noticed I lost all Oracle services for my grid, database and listener. I’m working on to make it back(services) without reinstalling binaries. I’m not sure if it’s possible to directly install 11g on windows 8.1 but you can try to run installation as Administrator with ignore option (run as Administrator install.exe -ignoreSysPrereqs).
Hello,
I’m sorry for my poor English since I’m a Chinese boy.
So,excuse me,please…
When I was installing Oracle 11g into my Windows 8,
it says that “OUI-1050 Error”,“s_dlgCfgNamingLabelSID”,“null”,”11.2.0.1.0”,etc.. (Sorry for that the others are Chinese words and I’m not sure how to translate them…)
Could you help me ?
Thank you~ : )
季 from China
Here is my email box: 673789405@qq.com
This version is not supported on windows 8 :). 11.2.0.4 is supported on windows 8.
Then how can I get the 11.2.0.4 version?
I only find this one on the Oracle’s website…
Do you have to install Oracle Grid with the Oracle Server? What are the disadvantages of just installing the Oracle Server? Regards.
Oracle Grid is optional no need to install it. It’s just extra layer to manage disks with quite many features like:
– online add/remove disks
– separation of duties between Oracle DBA and ASM DBA
– it’s solution dedicated for RAC installations to avoid installation of 3-rd party software
– niec ASM file system
– creating snapshots (clone databases)
and many many more
I don’t think they are disadvantages for Windows 7,8. But it’s cool to install it if you want to know how ASM works :).
Regards
Tomasz
thank u pro